Hosting
Due to the complexity of properly hosting RapidPro, it is not recommended to try to host RapidPro yourself for anything but the largest of installations. Instead, use one of the hosted service providers that have expertise in doing so.
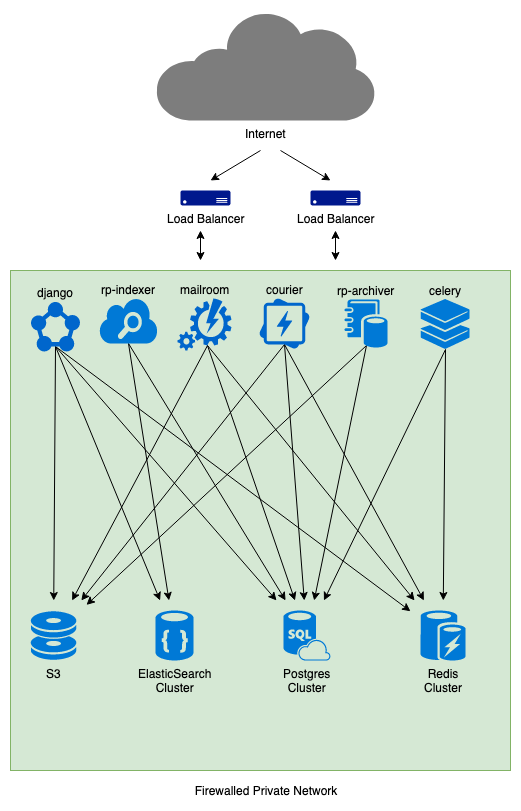
For a highly available installation, you will require:
- n+1 instances running the RapidPro Django frontend
- n+1 instances for the RapidPro Celery queue
- n+1 instances running Courier for sending and receiving of messages
- n+1 instances running Mailroom for handling of flows
- 1 instance running rp-archiver to archive messages and flows to S3
- 1 instance running rp-indexer to index contacts
- A PostgreSQL server with a hot standby
- A Redis server with a hot standby
- An ElasticSearch instance with a hot standby
- A load balancer routing traffic to Django, Courier and Mailroom
Note that hosting your own version of RapidPro is not an easy affair, the codebase changes daily and you'll want to stay up to date with the latest changes in order to have the latest features and bug fixes.
Again, unless you are doing a large deployment of your own and have experience running large software deployments, we do not recommend running RapidPro yourself.
Server Guidelines
Though the hardware required to run RapidPro at scale changes based on various optimizations made in the code, here are some rough guidelines for running a cluster capable of handling millions of messages per week.
- Django, Courier and Mailroom Servers - 2 servers - 4 Xeon CPUs, 16 gigs of RAM
- Redis Servers - 2 servers - 2 Xeon CPUs, 8 gigs of RAM
- ElasticSearch Servers - 2 servers - 16 gigs of RAM each, sufficient space for indexes
- DB Servers - 4 Xeon CPUs, 16 gigs of RAM
The configuration of gunicorn and celery workers is highly dependent on the kind of hardware you have, but given the above, these should get you started:
- Django - 10 gunicorn workers
- Default Celery Queue - 1-8 dynamic workers
- Courier - 32 workers
- Mailroom - 4 batch workers, 32 handler workers
Management features
On the administration side, there are a few features that can be enabled for hosting staff to manage your RapidPro installation.
These are controlled via groups and permissions and are defined in settings_common.py alongside the roles for regular users (admin, editor, viewer).
Accessing these features
- First create a superuser using:
$ python manage.py createsuperuser - Log in as this superuser
- Navigate to http://myrapidpro/users/user/ to manage users
Alpha and Beta groups
Allows RapidPro hosts to designate users that will be able to access new features before they are made available to all users
- select user on http://myrapidpro/users/user/
- add to group ‘Alpha’ or ‘Beta’
Customer Support
Allows RapidPro hosting staff to designate staff members the ability to add TopUps to orgs, manage users, and access orgs for troubleshooting/support
- select user on http://myrapidpro/users/user/
- add to group ‘Customer Support’
Users in the ‘Customer Support’ group can then add TopUps:
- go to http://myrapidpro/org/manage/ and click on the name of the org you wish to manage
- click on TopUps button
- click the Add TopUp button
- enter number of credits to add and click Create
Granters
Allows RapidPro hosting staff to designate staff members the ability to create new orgs with specific plans
Plans are defined in temba/orgs/models.py and their associated bundles are defined in temba/orgs/bundles.py
- select user on http://myrapidpro/users/user/
- add to group ‘Granters’
Users in the ‘Granters’ group can then grant new orgs using the following form:
- http://myrapidpro/org/grant/
- submit form
Mapping support
To enable RapidPro’s mapping features, country administrative boundaries must be imported. Nyaruka developed a tool to extract administrative boundaries from OpenStreetMap: https://github.com/nyaruka/posm And maintains a repository of simplified extracts in GeoJSON format: https://github.com/nyaruka/posm-extracts
To add a single country like Uganda, for example, follow these steps after cloning the https://github.com/nyaruka/posm-extracts repository:
- Visit https://nominatim.openstreetmap.org/ and search for ‘Uganda’
- Click on details and note the ‘OSM: relation’ ID, which in this case is 192796
- In your terminal, navigate to the rapidpro directory and run
cp /path/to/posm-extracts/geojson/R192796*_simplified.json . - Run
python manage.py import_geojson *_simplified.json
To import the entire world (NOTE this may take a while…):
- In your terminal, navigate to the rapidpro directory and run
cp /path/to/posm-extracts/geojson/*_simplified.json . - Run
python manage.py import_geojson *_simplified.json